Assigning CSR-based Certificates to TLS Contexts
You can request a digitally signed certificate from a Certification Authority (CA) for a TLS Context. This process is referred to as a certificate signing request (CSR) and is required if your organization employs a Public Key Infrastructure (PKI) system. The CSR contains information identifying the device such as a Distinguished Name (DN) or subject alternative names in the case of an X.509 certificate.
|
➢
|
To assign a CSR-based certificate to a TLS Context: |
|
2.
|
In the table, select the required TLS Context, and then click the Change Certificate link located below the table; the Change Certificates page appears. |
|
3.
|
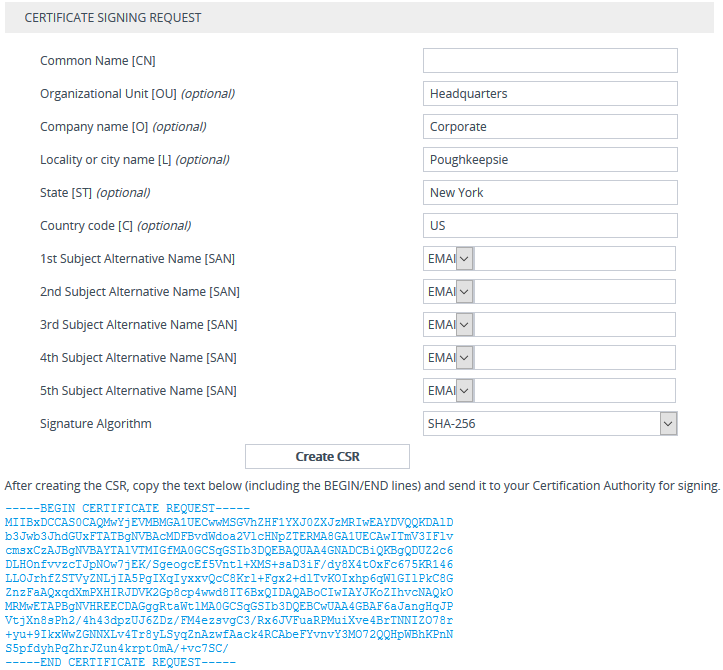
Under the Certificate Signing Request group, fill in the following information: |
|
a.
|
Distinguished Name (DN) fields (uniquely identifies the device): |
|
❖
|
In the 'Common Name [CN]' field, enter the common name. |
|
❖
|
(Optional) In the 'Organizational Unit [OU]' field, enter the section of the organization. |
|
❖
|
(Optional) In the ' Company name [O]' field, enter the legal name of your organization. |
|
❖
|
(Optional) In the 'Locality or city name [L]' field, enter the city where your organization is located. |
|
❖
|
(Optional) In the '
State [ST]' field, enter the state or province where your organization is located. |
|
❖
|
(Optional) In the '
Country code [C]' field, enter the two-letter ISO abbreviation for your country. |
|
a.
|
If you want to generate a CSR for SAN (with multiple subject alternate names), then from the 'Subject Alternative Name [SAN]' drop-down list, select the type of SAN (e-mail address, DNS hostname, URI, or IP address), and then enter the relevant value. You can configure multiple SAN names, using the 1st to 5th 'Subject Alternative Name [SAN]' fields. |
|
b.
|
From the 'Signature Algorithm' drop-down list, select the hash function algorithm (SHA-1, SHA-256, or SHA-512) with which to sign the certificate. |
|
●
|
Fill in the fields according to your security provider's instructions. |
|
●
|
If you leave the 'Common Name [CN]' field empty, the device generates the CSR with the default Common Name (CN=ACL_<6-digit serial number of device>). |
|
4.
|
Click the Create CSR button; a textual certificate signing request is displayed in the area below the button: |
|
5.
|
Copy the text and send it to your security provider (CA) to sign this request. |
|
6.
|
When the CA sends you a server certificate, save the certificate to a file (e.g., cert.txt). Make sure that the file is a plain-text file containing the "BEGIN CERTIFICATE" header. |
|
7.
|
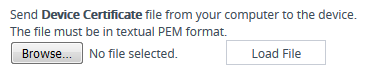
Scroll down to the Upload Certificates Files From Your Computer group, click the Browse button corresponding to the 'Send Device Certificate...' field, navigate to the cert.txt file, and then click Load File: |
|
8.
|
Wait for the certificate to successfully load to the device. |
|
9.
|
Save configuration with a device reset. |
|
10.
|
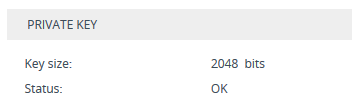
Verify that the private key is correct: |
|
a.
|
Open the TLS Contexts table, and then select the TLS Context. |
|
b.
|
Click the Certificate Information link located below the table. |
|
c.
|
Make sure that the 'Status' field displays "OK"; otherwise, consult with your security administrator: |
|
●
|
The certificate replacement process can be repeated whenever necessary (e.g., when the new certificate expires). |
|
●
|
You can also load the certificate through the device's Automatic Provisioning mechanism, using the [HTTPSCertFileName] parameter. |